Akay, there were a few great nights a couple of weeks back. Since then, it's been AWFUL. This is what life is like to scope fans, and we accept it, but I do admit it makes a pretty boring blog. I have a lot of older photos that are much better looking as my post-processing skills have improved, but honestly, with some of the other steps forward I have taken I just can't get excited enough about the to bother posting them.
So, if you are following this blog and are as aware as I am of its recent lack of new items, do what I do-look at what other photographers are up to.
I REALLY recommend this-just amazing.
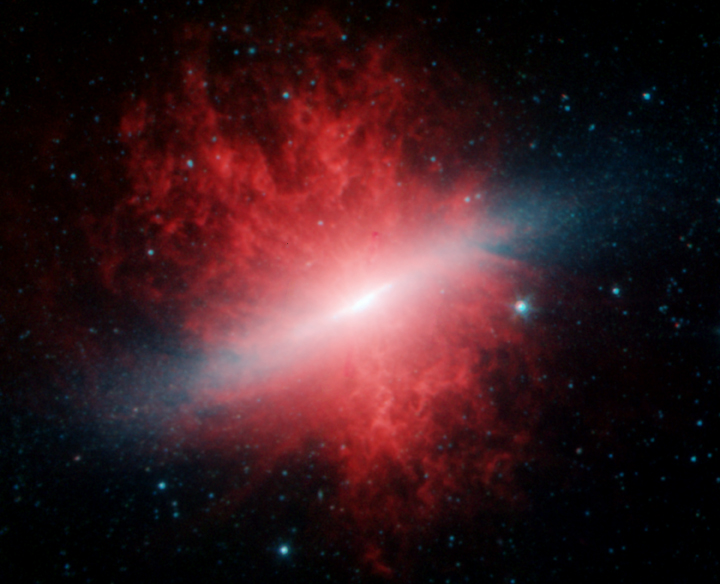
First, a Sky & Telescope article about a very special photo project-
http://www.skyandtelescope.com/community/skyblog/observingblog/121786019.html
And then the website of the photographer in the article-
http://skysurvey.org/
Really, this is worth looking at, even for those people that aren't goofy about stargazing.
Saturday, May 14, 2011
Saturday, May 7, 2011
NEWS FLASH-Amateur Astronomer Discovers Massive Neutron Star
There are many ways telescopes are put to work. On one end, there are the amateur instruments with good old-fashioned eyepieces attached. A step up from that are the rigs like mine, where cameras are doing the work. At the other extreme are the big monsters in Hawaii and Chile, which are used by scientists from around the world, often remotely.
A small step below those are the scopes, both optical and radio, that were state-of-the art not long ago, but no longer attract the front-line research (and money that goes with it.) One example is the radio telescope at Arecibo, Puerto Rico. It still is in great working order, and these days it is still collecting as much (if not more) data than ever. But it its case, that data sits around waiting for some grad student to take a look.
The Einstein@home project was started at the University of Wisconsin - Milwaukee was started to study information from gravity wave detectors, which were made to test one of the last unobserved phenomena predicted by Einstein. But they have added to the project, and also analyze data from Arecibo, searching in particular for massive neutron stars, especially those in binary systems (which are more "measurable" because of their effect on their partner star.)
Why is this in a blog about my backyard astronomy? Because their research is done on my home computer. Rather than use expensive and hard-to-fund mainframe time, Einstein@home runs on a cloud of home computers, using my unused CPU time. So while I may be taking astronomical pictures that have nearly no scientific value, my hobby is not all just play-I've helped discover two pulsars as well. In my twisted mind, that makes me a real astronomer too...
The second was announced just a couple of months ago, called J1952+2630. It's roughly 95% of the mass of our own sun, which is unusually heavy-it's only the fifth pulsar discovered in that class-and has a "day" of 1/48th of a second. Yep; something the weight of our sun is spinning 48 times per second. It is likely no more that 14 or 15 miles in diameter. A "preprint" report is available here.
Pulsars are formed when super-massive stars die, when they no longer have any material left that can be part of a fusion reaction. It's the heat of fusion inside a star that holds it up against its own gravity. Run out of fusion, you run out of anything to fight the gravity, and the star collapses in on itself, causing one hell of an explosion. Most of the star's matter is blown into space, but some remains, squeezed by it's own mass into a form of matter unlike anything else, called degenerate matter. Here, the bits that make up atoms are squeezed together, and the density is beyond our imagination-the common analogy is a teaspoon of the stuff weighing the same as a battleship. If the star was massive enough, this squeezed core becomes a neutron star. A bit heavier, and a black hole is formed. A bit smaller, a white dwarf is formed. But since white dwarfs are still made of regular matter, and black holes can't be directly observed, it's the neutron stars that interest scientists. Their formation should cause gravity waves to flutter through the galaxy, and they're observable, and that is why this research group is studying them; if they detect any gravity waves with the detectors, great. But if those waves can be correlated to real objects, even better.
If you're interested in using your computer in real front-line research, look into BOINC, which is the program developed at Berkeley that allows researchers to use computers distributed throughout the world in people's homes. It's a massive resource that is barely tapped right now. I've been part of several projects for some time, and that is how I discovered another pulsar, with nothing but a primitive 8" telescope and a home computer.
More light

In the first post of M64, the background was just barely darker than the spiral arms, but in darkening the background much of the overall size of the galaxy is lost. Here, the actual size is showing, and the line marking where the edge of the object is lost in noise has moved out quite a bit. With a few clear nights and a few more hours of exposure...
I just found this website from the Calvin Observatory about M64. A lot of good information. And an interesting photo...shot with a 16" Ritchey–Chrétien telescope at high altitude in New Mexico. Sure, it's a better picture than mine...but not by a whole lot, to be frank. No word on results from the Hobbes Observatory as yet.
Tuesday, May 3, 2011
Periodic Wobble
SO the issue this time wasn't my previous fix; one of the bolts that holds the RA drive worm gear block to the main body stripped. Or rather, the hole tapped into the body stripped, not the bolt-that would have been too easy to fix, of course. So, more drilling and tapping for oversize bolts. I have to say, the aluminum that the main body was cast from is not what anyone would mistake for real metal...scary.
Obviously, this was not a trivial little thing; notice that the Dancing Galaxy is moving quite a lot more than its own diameter. More Mambo #5 than Astrophotography 101. I'm shooting some new frames now to see how the fix worked; it's one thing to have a dial indicator say it's right; it's altogether another thing to actually get the pics. Stay tuned...
M64 The Blackeye Galaxy

Other than that weird black band of dust, M64 looks to be a fairly normal spiral galaxy, but that dust is a tip-off that something isn't quite right here. Most of the stars are orbiting the galactic core in the same direction, as expected. But most of the gas, and the stars in the outer reaches of the galactic disk are orbiting the other-it's actually two spirals that have recently collided and merged. When that happens, all the diffuse dust and gas can get scrunched up and condense into dust clouds, as has happened here. It may look dark in visible wavelengths, but an infrared picture shows that as those dust clouds condense they start giving rise to new stars, often some of the largest, hottest, and shortest-lived stars of all. Infrared light does not pass through our atmosphere very well, but this image from Hubble shows how hot the stars actually are in that dark cloud.
Monday, May 2, 2011
M51 again

It's so tempting to find new objects every night that I am with the scope, but after changes are made, I prefer shooting objects that I have done already, so I know if I have indeed improved anything. So, sorry if M51 is getting a little worn out here. If you don't like it, get your own scope. Better yet, get a scope whether you like this or not!
With the great seeing the last few nights, I thought it would be a good test of the changes i have made to the scope itself, rather than the mount. All of the screws and such used to line up all the mirrors were replaced with much larger hardware, with finer adjustments control, and the difference was staggering.
This alignment (called collimation) has some effect on the shape of stars and focus away from the center of the field, but it actually has an even bigger impact on contrast. That is why the last two nights, I've been picking objects visually that I never have gotten the faintest glimpse of from here.
And yes, it turns out it does have a large impact on the photos, too. This is only about 70 minutes worth of subs, far less than I would really want for a quality photo. In fact, it's very noisy and grainy in the fainter parts of the galaxy-that is strictly a sign that more photons need to be rounded up; you might remember how my pics of M81 took a huge leap forward in quality once I was stacking several hours of data, not tens of minutes. There's no point combining this with any earlier M51 sets, so I'll just use this as a new base to build on. Compare this to this picture, which was previously my best M51 shot.
I had a college astronomy prof who had worked on the Palomar All Sky Survey. He would show slides in class and whine and moan about the colors-his view was that the best way to find the proper color balance is to look at the colors of stars in the field, then match that. He would complain that pictures that purported to be a visual image should match reality, not just take advantage of whatever the more sensitive films showed. Hard to argue with that view, but it is not the standard way faint objects are photographed. (All that lovely bright red in so many pictures is simply wrong, for example; it should be lavender. That started with the Palomar survey; the filters they used in the RGB composites failed to allow a large part of the blue spectrum to pass into any of the images.) It's another matter when the purpose of the photograph is to show wavelengths we cannot see; those are called false-color photographs so that it's well-understood what you are seeing. Go Google some Spitzer Space Telescope pictures to see what false-color photography can uncover. If you've seen many images from that survey, you'd see that his opinion did not win out.
Anyway, getting long here-I have reached a milestone where my raw data is getting good enough that not only do my stars actually have color, I can use that as a reference in post-processing. See kids; sometimes you learn something in school that you end up caring about eventually!
I've also determined what had re-introduced the periodic bobble I mentioned earlier. Rather than rely on the fix I used last time, I'm waiting for my brain to stumble upon something a bit cleverer that will allow finer adjustment of gear angles and lash in the RA drive. I tend to get those ideas when I'm trying to think of something else, so I may spend the next few nights trying to clean the garage or something.
Sunday, May 1, 2011
Don't forget your eyes...
Tonight we had a bit of a star party at my place...not all could make it, but those who did got a treat. It was windy all day-40 mph sort of windy, and when darkness fell, stars weren't twinkling so much as dancing around the sky. But as often happens, an hour later, it was one of the best nights of seeing I can remember in ages.
No cameras tonight; this was a night for eyepieces and viewing. After all the non-scope fanatics got to see the usual views of Saturn (who, as usual, did not disappoint) the seeing improved enough that objects like M65 and M66 were not only there easily in my 8" Newt, but in Mark's 80mm refractor. For a short while, even NGC3628 was visible in the Newt. We we did the quick tour of globulars as well, and M4 was especially brilliant; many bright stars with that lovely glowing ball behind them.
Sometimes I just forget to look at plain old stars-not binaries, not the odd stuff, just stars. And as a result, I had forgotten how incredibly striking Antares is. As the home star of the cat that lives with Mark, it was especially poignant for us.
I have been so utterly focused on photography the last few months that I have neglected the eyepiece. But much of the last two weeks has been spent fine-tuning my scope itself, not just the mount-all the hardware used to collimate (align) the mirrors was redone, with larger screws with finer threads for adjustment, and the reward was tonight; much of what I could pick out has never been seen from this site with this scope before.
Hope you're feeling well soon, Scott.
Thursday, April 28, 2011
One step forward, ten back...
As soon as I finished he last photo, we were hit with a week of clouds. Now that they have passed, somehow I have picked up a periodic tracking error. 30 second shots are still possible, but roughly half the subs shot are trash. And what is odder, the problem that was causing this before does not seem to be to blame-so that is why there have been no new pictures this week; I'm playing Master Detective/Junior Machinist instead. All part of the game, though.
Monday, April 18, 2011
M81 & M82 remastered
Yeah, there has been an awful lot of this pair here lately...the post-processing is as much a part of learning this game as the scope is, though. Here is our pair once more, but with each galaxy exposed more evenly, and with a cleaner background. Since each object was being handled on its own, it isn't necessary to amplify the background a huge amount to bring out detail in the target objects.
Note that I tried to avoid making the background truly black...not only does that lose the faint wisps of many distant stars, it's never seemed right to me-the sky isn't black to begin with. All in all, for three months now sepnt trying to learn this art, as well as all the repair work, I am not ashamed to give myself a pat on the back for this one.

For those that care, this is a total of 491 30 second exposures (yes, over six hours.) North is to the right. (Generally, I leave North up, which would seem the obvious choice...but astro pics are most often shown with north down, since many scopes invert the image. First, I figure that any "up" or "down" is an artificial thing anyway, and second, Newtonian telescopes with a camera in the prime focus don't invert the image; that only happens when lenses are used, and there are none in my system; only mirrors. So I can put north anywhere I want it to be, just be turning the scope in the mount.) M81 seems somewhat brown and ruddy to me, but I was using the Hubble image of same as a color reference; can't argue with that. While I had some links to info about M82 a couple of weeks ago, I haven't said much about M81. In the middle of the lovely soft-looking center bulge is a black hole of over 70 billion solar masses. For such a pretty thing, it's in reality an incredibly violent place.
Sunday, April 17, 2011
M81 and M82 re-revisit
The use of a baffle to hide the moonglow made all the difference. The moon was actually far brighter tonight, and still it was kept under control. This is roughly the same number of subs as the previous night.
 M82 is all blown out again, but I'll have proper edits of that within a day or two, as well as better post-edits of this shot; again, I have only taken time to stretch it, and nothing else. In a rush to see what i had, I ended up stacking all subs, and some of them could definitely have been left out; I was dodging contrails much of the night.
 This is just a preliminary edit of M82; I will combine the subs from the last two days to produce a more finished one. But it's easy to see that this is a weird place. I'm a bit tickled to be able to get pics of "irregular" galaxies; I've always been fascinated by them.
I've finished the overall stacks from the last two nights, and since we expect clouds for several days I'll have the chance to process each galaxy here individually, while giving the background starfield the treatment it deserves as well. I've heard some people say that exposing different parts of the picture differently is a bit of a cheat-okay, it may be. But if so, then so is using a camera to take exposures longer than our eye can manage. I'm not interested in "composites", where the components of the final picture come from other pictures, but I do think it's fine to process different parts of the frame differently. It's done with film, too; that's why there are tools like Dodge Tool and Burn Tool in Photoshop.


I've finished the overall stacks from the last two nights, and since we expect clouds for several days I'll have the chance to process each galaxy here individually, while giving the background starfield the treatment it deserves as well. I've heard some people say that exposing different parts of the picture differently is a bit of a cheat-okay, it may be. But if so, then so is using a camera to take exposures longer than our eye can manage. I'm not interested in "composites", where the components of the final picture come from other pictures, but I do think it's fine to process different parts of the frame differently. It's done with film, too; that's why there are tools like Dodge Tool and Burn Tool in Photoshop.
Saturday, April 16, 2011
M81 and M82 revisit

BUT-after all I figured out about the camera today (including the fact that light falling on the LCD screen will actually leak into a picture, and a lot of it too-Canon, that is totally unacceptable design) and using a felt "diaper" for the camera while shooting, the results are unlike anything I ever imagined I would shoot; certainly not this early in the game. The color even pretty well agrees with the Hubble shots.
This is only a quick edit; it's late, and really M81 and M82 need to be adjusted a bit differently for exposure. It's kind of blown out here, but M82 (on the left) really is showing a lot of red glow and dust lanes in its core.
All the extra work the last two weeks paid off-I shot 225 subs at 30 each, and only 2 were rejected for tracking, 2 rejected for having airliners fly through them, and 221 included in the final stack. More of this pair to come soon, once I take the time to properly edit this and do something about the moonglow.
I can see how I need to make a baffle to keep light entering the scope tube at an angle that allows it to reflect directly into the focuser. The moon was at such an angle that I can afterward see that that was happening. The inside of the scope is just flat black spray paint, and actually that is not nearly flat or black enough, so keeping stray light out will be on the list of future projects-out of the scope as well as out of the camera.
Friday, April 15, 2011
Why "stack" frames?

In these conditions, the long exposures used for faint objects just won't help; the sky keeps getting exposed just as much as the target. Stacking, or adding a lot of short exposures, is not quite the same as having a long exposure. Instead, it keeps track of which pixels are the same in each shot, and which are different-the ones that are different are considered "noise" and ignored (or replaced with something-usually an average of all the pictures' color at that particular pixel.) So the final picture may be just as faint as a single short exposure, but when you brighten it a lot, like with this photo, the background noise has been reduced enough so that the sky still looks black.
In a nutshell, longer exposures capture more light from the target, which makes the target brighter. (That's the traditional way when film was used.) Stacking improves the ratio of picture to noise, so you are able to "amplify" the picture, so to speak, without drowning in the noise. The best photos use both; with shorter exposures, it's possible that some actual photons from the target are being tossed out as noise. So I still want to get to where I am shooting a minimum of 60 seconds per sub, and as much as 180. But there are times, like last night, that the ambient light prevents that, and that is when it is nice to rely on stacking alone to help draw those faint things out of the slop.
M101, the Moon, and the Viewfinder
So probably not the best choice of targets on a very wet night with a nearly full moon nearby, I admit. M101 is a huge object in the sky, but with a very low brightness. But it was there, and nothing else was really within reach with the moon where it was and my scope set up where it was. But I did learn a few things, or at least remember things that I have known for years and had set aside while I worked on other problems.
 I took two short sets, since I had to execute a meridian flip after a short time. Of course, I unthinkingly flipped my camera over as well, and halfway through the motion realized that my flat frames would now be useless. But for some reason, while trying to set it back in the original position, I noticed that I had the camera set for Automatic White Balance. Now, normally, that is okay, but when shooting regular pictures, I NEVER use that setting-I always choose the proper white balance for where I am. And it seems that I've had it on AWB since I started shooting with the scope.
 Now, even without light pollution, the sky is not truly black, but a ruddy brown. The AWB will try and compensate for that, and all of my galaxies have been very blue. I had assumed that that was largely due to the stretching in Photoshop, which does shift color. But with the white balance restored to the proper setting, compare the tone of these two pics-the first is blue, the second is proper.
In the second picture, a mysterious enemy has shown up again. A few weeks back, I had several sets come out with that odd vertical banding. Since it then went away, I was assuming it was an artifact from one of my reference frames. But it showed up again in the second half of the shoot. The galaxy could actually brighter in this pic, but the bands were just too dominant then.
My main suspect is light leak-especially with such a bright moon, I should have also have remembered this fact about SLR cameras. It's a small and subtle flaw, small enough that for normal uses, photographers can get away with ignoring it completely. But during long exposures, light coming in the viewfinder can actually bounce around the raised mirror and hit the film or sensor. The shots I did last night with the moon at my back were simply beautifully lit, just not the light I was after. I suspect these bands will have a similar cause. Sometimes, I will shoot my dark frames while I am putting everything away, and the scope will be sitting near the door with it's it's cover on. Sometimes I remove the camera, and shoot the darks with a body cap in place. But I will usually have some light turned on then to help me break down. I am guessing now that if I toss a piece of black fabric over the camera the problem will go away. I'll probably intentionally pollute some test frames as well just to see what that looks like.
No big copies of these pics; the session was short, and too few photons were collected. I stacked these with my earlier shots of M101, but the end result was honestly no longer acceptable to me; the color balance is too awful. So no great photographs, but a step forward, repairing my brain rather than my equipment this time.
Thursday, April 14, 2011
M13 Globular Cluster in Hercules
These are the first actual subs worth keeping that I have taken with the new setup. I still have a lot of work to do fine tuning the rig, but this isn't too bad. On the other hand, I only used about 2/3 of the frames i shot for the stack.

M13 is made up of perhaps half a million stars, and like most globular clusters, is orbiting around the center of the Milky Way galaxy. It's a pretty spectacular sight-the area visible in this picture is about 2/3 the size of the full moon, and in dark skies can even be seen with the naked eye, if only just.This image has some pretty blobby stars, but it was borderline foggy conditions...visually, I couldn't make out a single star in the constellation containing this cluster. This is just a baseline to add future exposures to, and a test of some of the mods I've been making to my scope setup. Given the nature of the skies, I didn't even spend much time with PhotoShop trying to clarify this picture, beyond some iffy contrast enhancement, since the background was really not black at all in the master photo, but reddish gray due to the normal light pollution and the moon.
M13 was discovered by Edmund Halley in 1714, and Messier added it to his catalog half a century later. You can imagine how this could have been mistaken for a comet. The globular clusters especially were of a concern to those early comet-obsessed astronomers, since they are perfectly identical to actual comets in all ways save two-they don't move, and they are actually miniature galaxies on their own, not just balls of ice and dirt. Messier, by the way, said that M13 was entirely nebulous, with no discernible stars...again, it shows just what they were able to learn and deduce with equipment much worse than what I have today.
Because their close proximity has drawn all the material together in the region, any dust and gas clouds were long ago turned into stars in the most globular clusters, so they generally have few if any younger stars. Indeed, most of them are full of stars that are even older than the Milky Way itself-as much as ten billion years old.
 Back in 2007, during a brief period when I first tried to get some photos with my scope, this was the best image I got of M13. Actually, it's probably the best image I got of ANYTHING that year, and it shows just why I gave it up as a bad cause. Of course, few things show the weakness in an astrophotography setup the way clusters do-they are made up entirely of point sources of light, and even the tiniest errors are obvious. The gaseous nebulae can still look beautiful even with some tracking problems-look back to my early Orion shots as an example.

M13 is made up of perhaps half a million stars, and like most globular clusters, is orbiting around the center of the Milky Way galaxy. It's a pretty spectacular sight-the area visible in this picture is about 2/3 the size of the full moon, and in dark skies can even be seen with the naked eye, if only just.This image has some pretty blobby stars, but it was borderline foggy conditions...visually, I couldn't make out a single star in the constellation containing this cluster. This is just a baseline to add future exposures to, and a test of some of the mods I've been making to my scope setup. Given the nature of the skies, I didn't even spend much time with PhotoShop trying to clarify this picture, beyond some iffy contrast enhancement, since the background was really not black at all in the master photo, but reddish gray due to the normal light pollution and the moon.
M13 was discovered by Edmund Halley in 1714, and Messier added it to his catalog half a century later. You can imagine how this could have been mistaken for a comet. The globular clusters especially were of a concern to those early comet-obsessed astronomers, since they are perfectly identical to actual comets in all ways save two-they don't move, and they are actually miniature galaxies on their own, not just balls of ice and dirt. Messier, by the way, said that M13 was entirely nebulous, with no discernible stars...again, it shows just what they were able to learn and deduce with equipment much worse than what I have today.
Because their close proximity has drawn all the material together in the region, any dust and gas clouds were long ago turned into stars in the most globular clusters, so they generally have few if any younger stars. Indeed, most of them are full of stars that are even older than the Milky Way itself-as much as ten billion years old.

Tuesday, April 12, 2011
The new gear
I haven't had any new photos to show for some days-I've been busy playing telescope mechanic.
When you want to upgrade equipment like I own, any telescope store will simply tell you that you must start over with new shiny (and expensive) equipment, since your inferior junk is simply not worth upgrading, or worse-is totally incompatible with "real" equipment.
This may be true if you aren't sure which end of a drill you're supposed to hold, but there is no reason you can't sigfinicantly improve the stuff yourself.
My tripod was horribly wobbly-the slightest touch to it or the scope (the kind of thing you would do if you tried to use it, for example,) would take 30 or 40 seconds to dampen itself out. Additionally, it was flexible enough that I could watch it deflect from side to side as the scope moved-well over half an inch. I went to some pretty funny lenghts to stabilize it, but a dog is a dog. A new tripod was needed. Well, firstly, it is true that my EQ mount will not bolt directly onto anything out there as is. So I went looking for the type used with many Alt-azimuth mounts, which have a large flat plate on top. New, something of adequate strength was upwards of $300, and that still would require modification. A local store has a back room full of used equipment, and by chance they had four suitable tripods, all alike. They wanted $40. But one of them had a broken clamp for adjusting the length of the leg-I pointed out that they'd only ever sell that one if they had sold virtually every other tripod in the store first. They gave it to me for ten bucks, and I replaced the clamp with one from a speaker stand. Now on to modding it to take my mount-
 This was fairly simple...if my old mount and tripod MUST go together, then just pull the top off of the old tripod and bolt it to the new one. The first night I tried this, I found I had to fiddle with my method a bit, but that was easily fixed. (See that freaky streaky thing two posts back...) And walla! as they say in Yurp...the tripod is now replaced, for a total cost of $10, since the speaker stand was already missing other parts anyway. I can sit on this thing and bounce around with no wiggle or wobble at all. I have an ETX-60 that I'll probably mount on the old tripod.
 Ages ago, the motor driving the declination axis died, and in this case it WAS true-an exact replacement simply didn't exist. But a motor from a scope sold by Orion turns out to have the same dimensions and motor speed, just a different set of reduction gears. That sells for $59 all over the internet...too high. At this same shop, some of the "used" stuff is actually new replacement parts that they no longer want to stock, and wouldn't you know, there was that Orion motor. That plus several of the clutches that I mentioned earlier were $15. (The clutch is that shaft with the chrome locknut and brass gear at left.) It did take some fiddling and drilling to adapt the gears from my old broken motor to fit, but in the end, it all worked. I hadn't realized how much I missed having this-a motor on this axis is not needed for following objects across the sky, but it makes it MUCH easier to aim and fine-tune. And yes, for you sharp-eyed viewers-the chrome thing on the left is indeed a Ludwig Hi-Hat clutch, now holding the bushings for the worm gear rather than holding cymbals on a drum set. It's getting harder and harder to decide what brand this thing is.
 I wish I had though to take a picture of the old electrics-it was a horrorshow. The handset had two telephone lines plus a battery pack hanging from it, which over the years had suffered from various cable wraps and zip ties and tangles. Each cord ran to a different part of the rig, and things were always a mess.
After working all the rust out of the handset, I replaced all the wiring-the handset now connects to a computer monitor cable, which leads to a junction box that lives under the tripod. That has the cords that run to the motors, as well as a plug to use either a battery pack or an AC adapter.
 Here's the finished rig-the handset can be stuck to any tripod leg with velcro, while the main electrical guts are on a box that straps inside one tripod leg. All very tidy, and so much less to trip over. I've added a steel rod from the scope mounting rail to the counterweight bar as well, to fight vibration. There is no detectable movement in any part of the mount or tripod as the scope is slewed through its entire range of motion. Which means two things-it's a much better platform for taking photos, and if there are still tracking issues and star trails, I can't blame anyone or anything but myself.
Today I have taken it all apart again to repaint a lot of the metal bits with Hammerite; this is going to be one very pretty kitty once that is done. Then I'll have to ruin that sleek look with some bands of bright yellow duct tape around the legs. Ugly, but I know I'm going to trip on them constantly if they stay black. Or I might add a red LED to the junction box.
Over the next couple of weeks, I should be able to show whether this makes for better pictures or not...
When you want to upgrade equipment like I own, any telescope store will simply tell you that you must start over with new shiny (and expensive) equipment, since your inferior junk is simply not worth upgrading, or worse-is totally incompatible with "real" equipment.
This may be true if you aren't sure which end of a drill you're supposed to hold, but there is no reason you can't sigfinicantly improve the stuff yourself.
My tripod was horribly wobbly-the slightest touch to it or the scope (the kind of thing you would do if you tried to use it, for example,) would take 30 or 40 seconds to dampen itself out. Additionally, it was flexible enough that I could watch it deflect from side to side as the scope moved-well over half an inch. I went to some pretty funny lenghts to stabilize it, but a dog is a dog. A new tripod was needed. Well, firstly, it is true that my EQ mount will not bolt directly onto anything out there as is. So I went looking for the type used with many Alt-azimuth mounts, which have a large flat plate on top. New, something of adequate strength was upwards of $300, and that still would require modification. A local store has a back room full of used equipment, and by chance they had four suitable tripods, all alike. They wanted $40. But one of them had a broken clamp for adjusting the length of the leg-I pointed out that they'd only ever sell that one if they had sold virtually every other tripod in the store first. They gave it to me for ten bucks, and I replaced the clamp with one from a speaker stand. Now on to modding it to take my mount-


After working all the rust out of the handset, I replaced all the wiring-the handset now connects to a computer monitor cable, which leads to a junction box that lives under the tripod. That has the cords that run to the motors, as well as a plug to use either a battery pack or an AC adapter.

Today I have taken it all apart again to repaint a lot of the metal bits with Hammerite; this is going to be one very pretty kitty once that is done. Then I'll have to ruin that sleek look with some bands of bright yellow duct tape around the legs. Ugly, but I know I'm going to trip on them constantly if they stay black. Or I might add a red LED to the junction box.
Over the next couple of weeks, I should be able to show whether this makes for better pictures or not...
Sunday, April 10, 2011
Some Terminology
I was asked about some of the words I've been tossing about, which were not usderstood by all the people reading. Try and remember, by using lingo I am only trying to appear smarter. Here are a few definitions.
Mount-the mechanical pile of stuff that is connected to the telescope, which allows it to point in different directions. It includes (in my case) the motors needed to keep the scope pointed at the same place in the sky while the Earth turns.
Tripod-well, the tripod. The mount attaches to the top of it. While often sold together, they are unrelated, and have their own demands for quality.
Clock drive-those motors can move the scope around at different speeds and directions (moving the scope from target to target is called slewing) but originally, all a motor did was to move the scope with the Earth's rotation (actually opposite that), and that is called tracking. They were given the name of Clock Drive many years before people were even using electric motors; being spring-driven, they were, in every way, clocks. With modern stuff, one set of motors is used for both needs-tracking objects, and slewing. When tracking, the mechanism can still be called a clock drive.
Subs-each photograph I take is actually made up of a lot of shorter photographs. If a faint galaxy would need an exposure of 30 minutes (meaning, leaving the "film" exposed to it for 30 minutes) I would likely take 60 30-second pictures, which are added together. Each individual exposure, or click of the camera, is called a sub. When I stay aimed at one object shooting a lot of subs, that is called a set. Sets are then stacked to produce my final photos.
And just how important is a clock drive? Many telescopes are sold without them, even these days, and even some pretty big scopes. Well, the Earth takes 24 hours to rotate the 360 degrees of one circle. That works out to one degree of rotation every four minutes. The full Moon is almost exactly one half of a degree across. Which means, if you focus a scope on the moon, in two minutes it will be completely off center in two minutes. The bottom line is that even a wide-angle scope like mine can only take a picture for about 3 seconds without a clock drive; after that, the stars are stripes, not dots. Most of my short astrophotography career has been learning how to align the various gears and axes of the mount to allow longer exposures. Those big scopes sold with no clock drive are definitely not to be used for photography. (Usually they are a close relative to my scope, called a Dobsonian. A Dob is not actually a type of telescope, just a type of mount for one.)
Hope that makes it clearer. And please, if I say something you don't understand, ask about it-that's why this blog is here. This isn't supposed to be an astronomy textbook-I'm just going to write about what I'm doing, mostly for fun, so without questions, I won't know what other info is important.
New equipment
Over the last few days, I managed to get my hands on a massive new tripod, an new motor for my declination axis (haven't had one in years) and a handful of drive clutches that were actually machined by someone who CARED. We had a little star party Saturday night, but while a lot of fun was had by all, I broke a basic rule of any science/engineering/mechanical project. A wise person will only change one thing at a time when experimenting. But me-wise? HAH! I laugh at wisdom. I started the night like this-
1. A new tripod,
2. An untested and improvised means of attaching my mount to it,
3. A new motor in a place where for years I have only had hand controls,
4. freshly-designed, cut, and untested mounting hardware for that motor,
5. A location I was not familiar with,
6. Friends around rather than doing all of this alone like usual.
7. There may have been some single malt whisky involved
8. My hand controller (which runs all of those motors) Started randomly changing its mind about which hemisphere we're in.
In addition, I still hadn't had a night shooting with the improved parts mentioned below. So a LOT of variables were being dealt with at once.
The result is that when I encountered problems, there were FAR too many things to track down...which led to some truly hilarious results, as well as one of the most astonishing astronomical images ever created-

I doubt I will ever be able to equal this incredible achievement.
In time, I finally figured out what was wrong, but was running out of night. So when I finally started shooting, I ended up making mistakes that made most of the night's pictures useless (but well-tracked-yay!). In the next few days, I'll properly sort out the entire new setup, and the difference should be considerable from what I was working with before. Scott shot a LONG set of subs of M13, while Mark was getting video of Saturn that should be stackable into something pretty special; I'm looking forward to seeing their results for the night.
Friday, April 8, 2011
Algoreb in Corvus

The name Algoreb has been applied to another star in the same constellation in the past. But the really interesting thing about this pair is that they represent one of the few things left in our world that you can't quickly learn about on the internet. Efforts to Google it give you a lot of information about Al Gore, but almost nothing about this star.
Bingo


So anyway; the hole was enlarged enough for the part to fit axially, and I added three set screws to not only take up the slop but allow some adjustment later if needed.
The weather was mostly cloudy, so I didn't get to test it hard....but I was able to get some star trails five minutes long with the mount intentionally out of place, and they were straight lines. Before, they had a v-shaped jog every 110 seconds or so. I did a quick and dirty polar alignment, and got a bunch of 120 second frames with no drift. So the 30 second restriction is lifted. Of course, with my old camera, 30 seconds is the limit of what I can shoot without manually exposing each frame; and with a light-polluted sky, it's not always good to shoot longer than that. But now I have options, and I won't have to toss a third of the frames I shoot. This was the last major step in transforming this old pile into a useful photography tool. Not a great one, but good enough for me to spend a lot more time learning with.
A closing thought? How about this-in all the years I've collected little bits and sticks and clamps and cute fancy magnets so that I can get a dial gauge to sit exactly where I want it, I suppose I never actually needed it on something made entirely of aluminum and brass. I spent more time finding a way to attach the gauge then I spent fixing the part. The moral being, you should ALWAYS get that extra tool, even if you aren't sure how you'd ever use it-you never know.
Thursday, April 7, 2011
M81 & M82

These two galaxies are inextricably linked-M82 is responsible for the formation of the spiral arms in M81, while M81 has caused the massive amounts of star formation in M82. Eventually, the two will merge into one galaxy.
I'll post better pics of both soon, once I can edit the picture for each individual galaxy. But really, I can't wait for a night of good dry still air to shoot these two again...it was supposed to be stormy tonight, and while it was clear, it was very turbulent; hence the big fat stars. Lots of room for improvement here, even at my current skill level, but I'm still proud of the shot-M81 is such a pretty galaxy, and this is the nicest picture of a spiral that I have taken so far, I think.
Subscribe to:
Posts (Atom)